Learn to make a unique flower bead bracelet with our easy guide. Perfect for adding a touch of elegance to any outfit. Start crafting today!
Introduction: How to make flower bead bracelet?
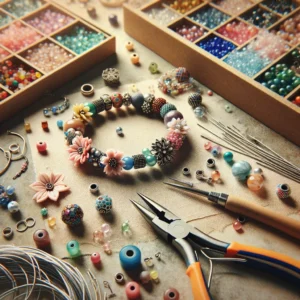
Making your own flower bead bracelet is not just a crafting project; it’s an opportunity to wear your creativity on your sleeve—quite literally! This DIY guide will walk you through the process of creating a beautiful and vibrant piece of jewelry that adds a touch of elegance and personality to any outfit. Whether you’re a seasoned jewelry maker or a novice looking to dive into a new hobby, this guide is tailored for all skill levels.
Materials Needed:
- Beads: Choose a variety of colors, shapes, and sizes to bring your floral designs to life. Opt for beads that complement each other and stick to a harmonious color scheme to ensure a visually appealing bracelet.
- Wire: Select a sturdy jewelry wire that’s manageable and durable. The thickness of the wire should be compatible with the size of the beads you’ve chosen.
- Clasp: Pick a clasp that not only matches the style of your bracelet but is also secure and easy to manipulate.
- Pliers: You’ll need round-nose pliers and wire cutters. These tools are indispensable for shaping the wire and trimming it to the perfect length.
Step-by-Step Instructions:
- Cut the Wire: Begin by cutting a piece of wire to your bracelet’s desired length, allowing extra inches at each end for the clasp.
- Create the First Flower: Slide a bead to the center of the wire, fold the wire in half, and twist it around the bead to secure it. This bead will form the center of your first flower.
- Add Petals: Continue adding beads to each side of the wire to create petals, twisting the wire around each bead to fix them into place. Repeat until you have a complete flower.
- Repeat for More Flowers: Using different colored beads, replicate the process to create additional flowers for your bracelet.
- Assemble the Bracelet: Connect the flowers by twisting the wire around each one, linking them into a floral chain.
- Attach the Clasp: Use the extra wire at the ends to attach the clasp, ensuring it’s securely fastened.
- Final Touches: Trim any excess wire and use your pliers to bend in sharp ends, finalizing your flower bead bracelet.
Tips for a Successful Flower Bead Bracelet:
- Vary bead sizes and shapes for unique floral patterns.
- Experiment with color schemes that reflect your style.
- Work patiently with the wire to prevent any mishaps.
- Let your creativity flow and don’t shy away from trying new designs and techniques.
Conclusion: How to make flower bead bracelet?
Creating a flower bead bracelet is a rewarding way to express your creativity and add a unique piece to your jewelry collection. By following these step-by-step instructions and utilizing the tips provided, you can craft a bracelet that’s not only beautiful but also a reflection of your personal style. Dive into the world of DIY jewelry making and let your imagination bloom!
FAQs: How to make flower bead bracelet?
Q: Can I use fishing line instead of wire? A: Yes, fishing line can be a substitute for wire, especially if you prefer a more flexible bracelet. However, ensure it’s sturdy enough to hold the beads.
Q: How do I choose the right bead size? A: Consider the scale of the flower you wish to create. Larger beads work well for outer petals, while smaller beads are ideal for inner details.
Q: What if my wire keeps breaking? A: Opt for a higher gauge (thinner) wire for flexibility or a lower gauge (thicker) wire for durability, depending on your beads’ weight.